


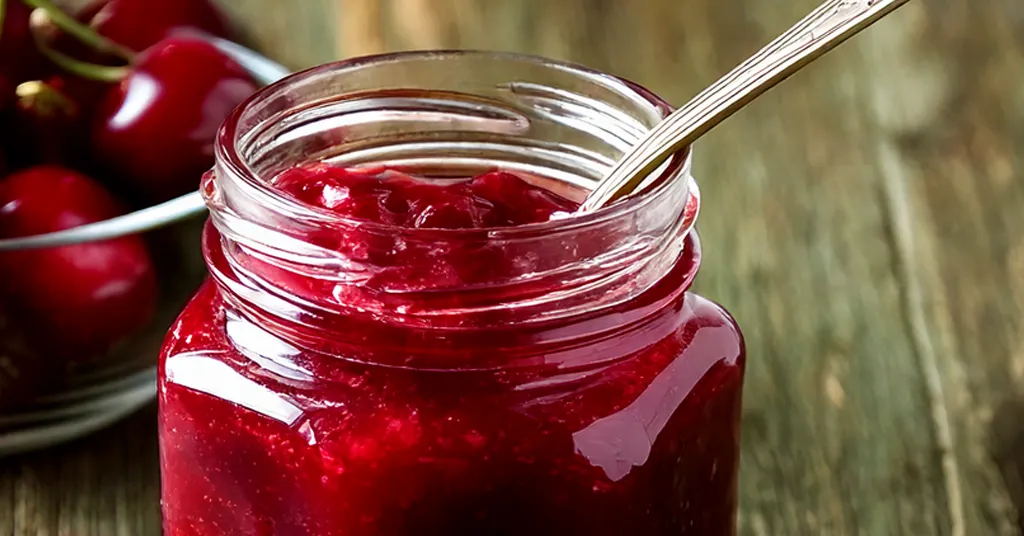
Making cherry jam at home is a fun way to capture the sweet, tangy taste of fresh cherries. With the right cherry jam recipe, this process can be simple, even for beginners. Cherry jam isn’t just a delicious spread for toast—it’s a versatile addition to desserts, baking, and more. For those preserving at home, ensuring food safety with a trusted recipe is essential. This recipe is found in the Ball Complete Book of Home Preserving and will yield about 6 half-pint jars of Cherry Jam.
Sweet Cherries vs Tart Cherries: Choosing the Right Fruit
When you’re preparing any cherry jam recipe, choosing the right type of cherry is one of the most important factors. Sweet cherries and tart cherries each bring distinct flavors and characteristics to your homemade cherry jam. Understanding their differences will help you make the perfect choice for your recipe.
What Are Sweet Cherries?
Sweet cherries, like the widely loved Bing or Rainier varieties, are known for their natural sugary taste and firm texture. These cherries are perfect for fresh eating, but they also shine when used in jams.
Wondering if sweet cherries are the right option for your cherry jam recipe with liquid pectin? Here’s what they offer:
- Flavor: Rich, dessert-like sweetness that pairs beautifully with baked goods or a morning slice of toast spread with jam.
- Texture: Ideal for preserving texture in jams as they hold up well during cooking.
- Availability: Widely available during the summer months, making them a seasonal favorite for jam-making enthusiasts.
What Are Tart Cherries?
Tart cherries, like Montmorency or Morello varieties, have a bright, tangy flavor that contrasts with their sweet cousins. These cherries are often used in cooking and baking, as their puckering tartness balances beautifully when sugar is added. For making cherry jam, tart cherries are a common choice due to their ability to create a complex, vibrant flavor.
Thinking about using tart cherries for your homemade cherry jam? Here’s what makes them unique:
- Flavor: A punchy tartness that transforms into a rich, balanced taste once cooked with sugar or pectin.
- Pectin Content: Tart cherries naturally contain higher levels of pectin, which makes them a great choice if you’re following a cherry jam recipe for canning.
- Versatility: Beyond jams, they’re also used in pies and syrups, making them a pantry staple for avid preservers and bakers.
Choosing Based on Your Cherry Jam Recipe Needs
Selecting sweet or tart cherries often comes down to your personal taste and the kind of cherry jam canning recipe you’re working with. Here are some quick tips to help you decide:
- Prefer a dessert-like jam? Go with sweet cherries.
- Want a tangy, complex flavor? Choose tart cherries.
- Making a balanced recipe with pectin? Tart cherries often blend better due to their natural pectin levels.
No matter which you choose, both varieties can lead to outstanding results. Adjust your sugar and pectin levels based on the type of cherry to create this perfect Ball cherry jam recipe for your pantry.
By taking time to select the right cherries, you’re one step closer to making cherry jam that’s customized to your taste preferences. If you choose sweet, tart, or somewhere in between, the cherries you choose will shape the overall outcome of your canning cherry jam recipe.

Essential Ingredients and Tools for Cherry Jam
Making cherry jam at home is all about simplicity and precision. The right ingredients and tools will not only help you achieve the perfect consistency but also enhance the flavor and safety of your canned goods. I will walk you through everything you need to prepare before starting your cherry jam recipe.
Ingredient List
Before you begin, gather the following ingredients to ensure your jam-making process is smooth from start to finish. Here’s what you’ll need:
- 4 cups finely chopped, pitted Sweet or Tart Cherries
Cherries are the heart of this recipe. You can use sweet cherries, tart cherries, or a combination of both depending on your flavor preference. Sweet cherries bring a dessert-like sweetness, while tart cherries add a tangy punch. Remember to pit and finely chop them for even cooking. - 2 tbsp Bottled Lemon Juice (Omit if using Tart Cherries)
Lemon juice plays a critical role in balancing the sweetness of the cherries and ensuring the acidity level is safe for canning. If you’re working with tart cherries, which are naturally acidic, you can skip the lemon juice. - 6 1/4 cups Granulated Sugar
Sugar isn’t just a sweetener in this recipe; it’s also a natural preservative. It binds with pectin to create the jam’s thick, spreadable texture. Measure carefully—balancing sugar levels is key to achieving the right consistency. - 6 oz Liquid Pectin (2 pouches)
Liquid pectin helps the jam set properly. It’s especially helpful when working with low-pectin fruits like sweet cherries. Be sure to use the specified quantity to avoid a runny or overly firm jam.


Equipment List
Here is the equipment I used to make this recipe:
- Knife
- Cutting Board
- Cherry Pitter
- Liquid Measuring Cups
- Measuring Cups
- Measuring Spoons
- Large Stainless Steel Pot
- 1/2 pint canning ladle
- Water Bath Canner or Steam Canner
- Half pint canning jars
- Lids
- Bands
- Jar Lifter
- Headspace Measure/De-Bubbler
Having the right ingredients and equipment ready is one of the first steps to making homemade cherry jam. Wondering about alternative ways to enhance jams? Explore ideas like incorporating Cherry Chocolate Jam for special occasions.
Step-by-Step Guide to Making Cherry Jam
Making cherry jam at home is a satisfying and straightforward process when you follow a clear guide. Let’s take a closer look at how you can successfully make and preserve your own delicious cherry jam.
Preparing Your Jars and Canner
Starting with clean equipment is key to ensuring both food safety and the long-term quality of your cherry jam.
- Wash Your Jars and Lids: Use warm, soapy water to clean all your jars and lids. After cleaning, inspect them carefully for any chips, cracks, or bubbles, as damaged jars can cause sealing issues.
- Prepare Your Canner: Depending on your equipment, you’ll use either a water bath canner or a steam canner.
Using a Water Bath Canner:
- Place the water bath canner on your stove and insert the canning rack.
- Add enough water to the canner so that it will cover the jars by at least 2-3 inches.
- Start heating the water, bringing it to a boil while you prepare the rest of your ingredients.
Using a Steam Canner:
- Position the steam canner on your stove and insert the rack into the base.
- Pour in the recommended amount of water, as per the manufacturer’s instructions.
- Add your jars to the canner.
- Cover the canner with its lid and start heating to generate steam.
Cleaning and proper preparation set the foundation for safe and efficient canning.
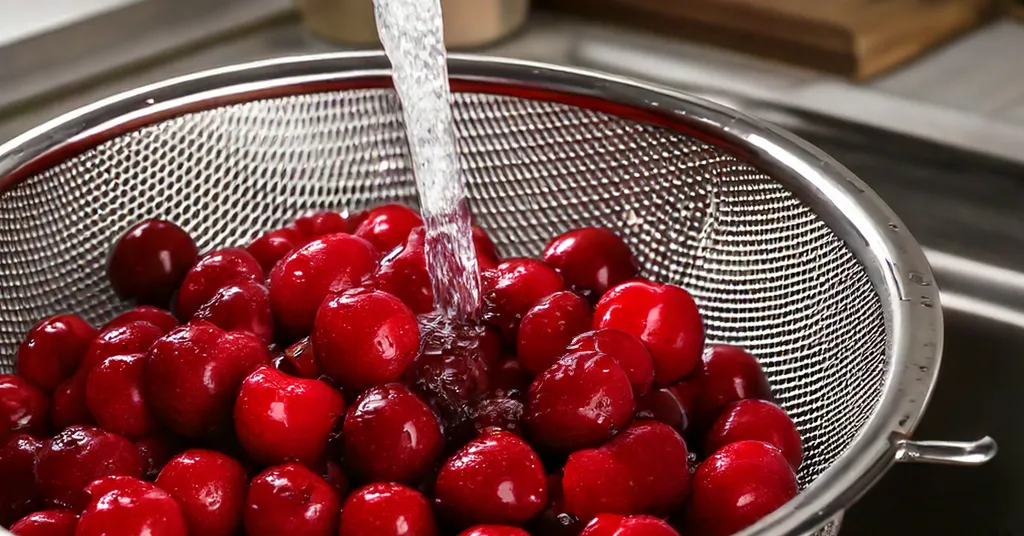
Preparing the Cherries
The main ingredient in your cherry jam recipe deserves special attention. Properly preparing the cherries ensures a flavorful and visually appealing final product.
- Wash and Pit the Cherries: Begin by washing the cherries under cool running water. Then, use a cherry pitter or a small paring knife to remove the pits.
- Chop the Cherries: Finely chop the pitted cherries using a sharp knife and cutting board. Prepare enough to measure exactly 4 cups. Pro tip: Save time by using a food processor, but take care not to over-pulse, as you want distinct cherry pieces in your jam.
Taking the time to prepare your cherries properly will make cooking the jam quicker and smoother.
Cooking the Jam
Now it’s time to bring everything together and create a beautiful, spreadable cherry jam. Follow these steps for consistent results:
- Combine Ingredients: In a large, deep stainless steel pot, mix 4 cups of chopped cherries, 2 tablespoons of bottled lemon juice (if using sweet cherries), and 6 ¼ cups of granulated sugar.
- Bring to a Boil: Over high heat, stir constantly while bringing the mixture to a full rolling boil—a boil that doesn’t stop when stirred.
- Add Liquid Pectin: Stir in 6 ounces (2 pouches) of liquid pectin. Continue boiling hard for exactly one minute, stirring constantly.
- Remove from Heat: Take the pot off the stove and skim off any foam that forms on the surface with a spoon.
Safe and Successful Canning Cherry Jam
The final step in creating your cherry jam is sealing and processing the jars. This ensures a vacuum seal, preserving your jam for months to come.
- Fill Jars with Jam: Remove preheated jars (from your canner) carefully with a jar lifter, pouring out any hot water. Ladle hot jam into jars, leaving ¼ inch of headspace. Use a de-bubbler to release any air trapped in the jar before adjusting the headspace if needed.
- Seal the Jars: Wipe clean the rims of the jars with a damp cloth to remove any residue. Center the lid on top, and screw the band on until fingertip-tight.
- Process in Your Canner:
- Water Bath Canner:
- Lower the water bath canner rack into the boiling water. Ensure your jars are covered by at least 2 inches of water.
- If your water is not boiling start your processing time when the water is boiling. Process 1/2 pint jars for 10 minutes. Make sure to adjust your time for altitude.
- Set a timer, it makes it much easier to make sure you process for the correct time. When your timer goes off turn off the heat and remove the canner lid.
- Leave the jars in the water for 5 minutes.
- Steam Canner:
- Put the lid on the steam canner. Turn your stove on high until your steam canner water comes to a vigorous boil. Continue heating so the indicator is in the correct “Zone” per your altitude.
- Start your processing time when the needle reaches the maximum point you have tested your steam canner to reach in your “Zone”.
- Adjust the burner so that it maintains an even rolling boil throughout the entire processing time. Usually, this will be much lower than where it was set for the vigorous boil. If the top lid is lifting and/or spitting water from the edges this is an indication that you have the heat turned up too high. Slowly reduce the heat until this stops. Watch the indicator to ensure the temperature does not decrease.
- The processing times for steam canning are the same as for water bath canning. Process 1/2 pint jars for 10 minutes.
- Make sure to adjust your time for altitude. Set a timer, it makes it much easier to make sure you process for the correct time.
- When your timer goes off turn off the heat and let the canner stand for 5 minutes with the lid on before removing the jars. The lid MUST remain ON the canner during this time. This cool-down period is necessary to ensure the jar contents are properly processed.
- Carefully remove the lid by tilting it away from you to avoid steam burns.
- Water Bath Canner:
- Cool Down: Remove them with the jar lifter and place them upright on a kitchen towel or wire rack. Avoid tilting the jars as this may interfere with the seal. Let them cool undisturbed for 12-24 hours.
Once fully cooled, check the seals by pressing the lid lightly; it shouldn’t flex or pop. If sealed properly, remove the bands, wash the exterior of the jars, and label them with the recipe name and date.
By following this step-by-step guide, your cherry jam will not only taste phenomenal but will also be safely preserved for your enjoyment year-round.


Using Cherry Jam
Cherry jam is incredibly versatile, offering the perfect mix of sweetness and tanginess to complement both sweet and savory dishes. If you’re looking to elevate a classic dessert recipe, whip up a quick snack, or add a gourmet flair to your dinner table, cherry jam has you covered. Below are some creative ways to incorporate this delicious preserve into your meals.
Creative Ways to Use Cherry Jam
If you’ve ever wondered how to make the most of your homemade cherry jam, think beyond toast! Here are some inspiring ideas to get started:
- Drizzle Over Cheesecake: Take your cheesecake to the next level by layering it with a generous drizzle of cherry jam. The rich, creamy texture of the cheesecake pairs beautifully with the sweet-tart flavor of the jam.
- Mix into Yogurt: Stir a spoonful of cherry jam into plain or Greek yogurt for an instant flavor boost. It’s an easy way to add natural sweetness and a pop of color to your morning routine.
- Use as a Meat Glaze: Combine cherry jam with soy sauce, balsamic vinegar, or even Dijon mustard to create a mouthwatering glaze for meats like pork chops, chicken, or even duck. The fruity glaze caramelizes beautifully, lending a rich and tangy flavor to your dish.
- Pair with Sweet Rolls or Pastries: Spread cherry jam over croissants, biscuits, or Danish pastries before baking for a bakery-style treat at home.
- Serve with Cheese Boards: Complement the flavors of creamy Brie, sharp aged Cheddar, or tangy blue cheese with a dollop of cherry jam. It’s an effortless way to bring sweetness and balance to your charcuterie board.
Looking to diversify your jam recipes? Try adding a batch of cranberry raspberry jam to your pantry for more fruity options!
Making cherry jam at home offers a perfect mix of satisfaction and creativity, allowing you to preserve fresh cherries for year-round enjoyment. Preserving your cherry jam through a reliable canning method not only ensures its safety but also builds your confidence as a home preserver.
Additional Jam and Jelly Recipes
Recipe Card
Cherry Jam Recipe with Liquid Pectin
Equipment
- Water Bath Canner or Steam Canner
- Steam Canner or Water Bath Canner
Ingredients
- 4 cups Finely Chopped, Pitted Sweet or Tart Cherries
- 2 tbsp Bottled Lemon Juice Only if using Sweet Cherries. Exclude if using Tart Cherries.
- 6 1/4 cups Granulated Sugar
- 6 oz Liquid Pectin (1 pouch 3 oz/85 mL)
Instructions
- Wash your jars and lids in warm soapy water. Make sure there are no chips or bubbles in your jars.
- Wash your cherries. Pit your cherries using a cherry pitter. Using your knife and cutting board finely chop your cherries to measure 4 cups.
- Prepare your cannerUsing Water Bath Canner: Put your water bath canner on your stove. Add your canning rack to the water bath canner. Add enough water to cover jars with at least 2-3 inches of water. Start to bring your water to a boil. Using a Steam Canner: Put your steam canner on your stove. Add the steam canner rack to the bottom of the steam canner. Add the recommended amount of water to the steam canner according to the manufacturer. Put the lid on your steam canner and start your stove.
- In a large, deep stainless steel pot, combine cherries, lemon juice (if using sweet cherries only), and sugar. Stir well.
- Over high heat, stirring constantly, bring the fruit mixture to a full roiling boil that cannot be stirred down.
- Stir in pectin.
- Boil hard, stirring constantly for 1 minute. Remove from heat and quickly skim off the foam.
- Once you have hot jars and hot cherry jam.Water Bath Canner:Remove the water bath canner lid. Remove your jars from the boiling water one at a time using your jar lifter. Dump the water out of the jar into your water bath canner to ensure there is still 2-3 inches of water above your jars.Steam Canner:Remove the steam canner lid. Remove your jars from the steam canner one at a time using your jar lifter.
- Ladle hot cherry jam into hot jars, leaving 1/4 inch (.5 cm) headspace (Check with headspace measurer). Remove air bubbles with a de-bubbler and adjust the headspace by adding more hot jam if necessary.
- Wipe the rim to ensure a good seal is made with the lid. Center the lid on the jar and screw the band down to fingertip tight. Repeat until all jam is used.
- Place jars back in the canner with your jar lifter.
- Water Bath Canner:Lower the water bath canner rack into the boiling water. Ensure your jars are covered by at least 2 inches of water.If your water is not boiling start your processing time when the water is boiling. Process 1/2 pint jars for 10 minutes. Make sure to adjust your time for altitude.Set a timer, it makes it much easier to make sure you process for the correct time. When your timer goes off turn off the heat and remove the canner lid.Leave the jars in the water for 5 minutes.Steam Canner:Put the lid on the steam canner. Turn your stove on high until your steam canner water comes to a vigorous boil. Continue heating so the indicator is in the correct "Zone" per your altitude. Start your processing time when the needle reaches the maximum point you have tested your steam canner to reach in your "Zone".Adjust the burner so that it maintains an even rolling boil throughout the entire processing time. Usually, this will be much lower than where it was set for the vigorous boil. If the top lid is lifting and/or spitting water from the edges this is an indication that you have the heat turned up too high. Slowly reduce the heat until this stops. Watch the indicator to ensure the temperature does not decrease.The processing times for steam canning are the same as for water bath canning. Process 1/2 pint jars for 10 minutes.Make sure to adjust your time for altitude. Set a timer, it makes it much easier to make sure you process for the correct time.When your timer goes off turn off the heat and let the canner stand for 5 minutes with the lid on before removing the jars. The lid MUST remain ON the canner during this time. This cool-down period is necessary to ensure the jar contents are properly processed.Carefully remove the lid by tilting it away from you to avoid steam burns.
- Using your jar lifer carefully move the jars onto a wire rack or kitchen towel to allow them to cool. When moving the jars try not to tilt them to the side as this could affect the seal of the jars. Allow your jars to cool for 12-24 hours before handling.
- Once cool, remove the canning rings from the jars. Wash your jars off to ensure no food residue on the outside of the jar from processing. Label your jar with the name of the recipe and date. This will help you remember what recipe you used to can and the date will allow you to use the oldest canned goods first.