


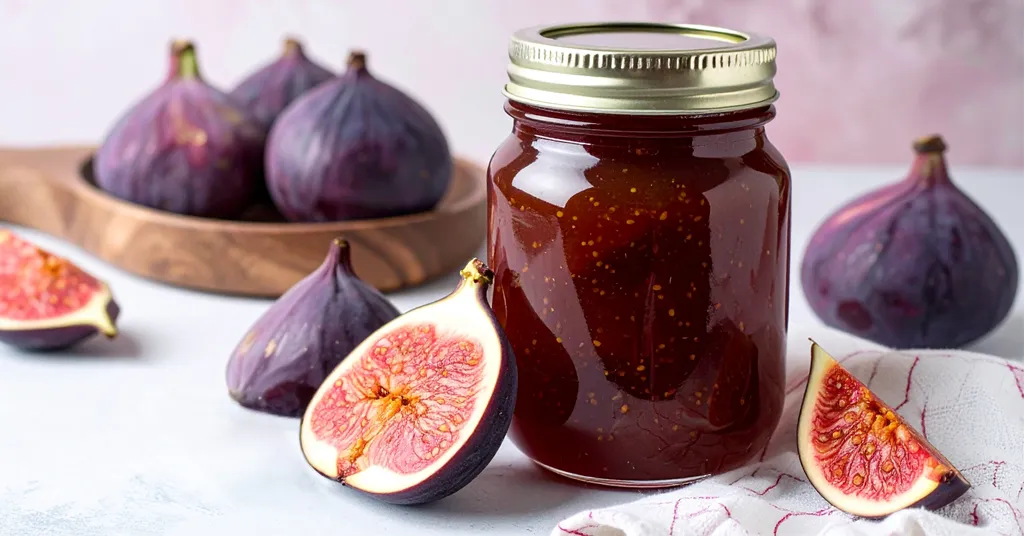
Nothing captures summer quite like a jar of homemade fig preserves on the shelf. Making your fig preserves turns a classic favorite into something truly special, letting you savor the rich, natural sweetness of figs all year round. There’s a reason fig preserves recipe searches are so popular among home food preservers. If you’re looking to can whole figs or whip up a big batch for gifting, this recipe brings cozy, old-fashioned flavor to your table.
From prepping whole figs to learning the art of canning, you’ll find step-by-step guidance every home preserver can follow. Get ready to learn the simplest way to create delicious, homemade fig preserves you’ll want to share with everyone you know.
Ingredients for Homemade Fig Preserves
This recipe comes from the Ball Blue Book Guide to Preserving, 38th edition. This recipe will yield about 6 half-pint jars of fig preserves. Here are the ingredients needed for this recipe:
- 2 quarts of figs
- 2 quarts of boiling water
- 2 2/3 cups sugar
- 1 quart of water
- 1 lemon peel, thinly sliced
- 3 Tbsp bottled lemon juice
This recipe has a long resting time, but it is worth it when the preserves are finished.
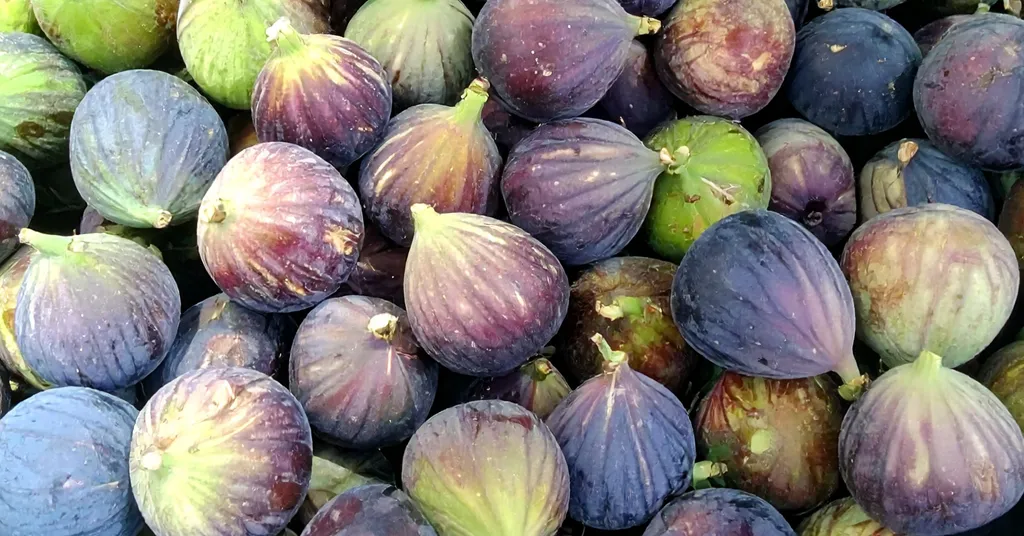
Selecting and Preparing Fresh Figs
Every great fig preserves recipe starts with the best figs you can find. Choosing and prepping fresh figs isn’t complicated, but a few simple steps make a world of difference for your homemade fig preserves. Fresh, ripe figs bring out that unbeatable, sweet flavor everyone loves, so it’s worth taking your time at this stage.
Choosing the Best Figs for Preserves
Start with figs that are plump, fully ripe, and just a little soft to the touch. Look for skins that are unbroken, smooth, and richly colored. Avoid figs with bruising, cracks, or any sign of mold. Underripe figs often taste bland and may not soften up enough during cooking. Stick with fruit that feels heavy for its size and gives slightly when you press it.
While you can use any variety, common types like Brown Turkey, Celeste, or Mission all make a delicious whole fig preserve recipe. Freshness is key. Try to use figs within a day or two of picking or purchasing.
Keep this short checklist in mind:
- Choose ripe, but not mushy, figs
- Avoid figs with cracks or mold
- Store figs in the fridge if you can’t prepare them right away

Washing and Prepping Figs
Prepping figs is a breeze, but don’t skip this step. Rinse your 2 quarts of figs and a lemon (which you’ll use the peel for flavor in your fig preserving recipe) under cold, running water. Drain thoroughly so there’s no excess moisture hanging around.
If you want a true homemade fig preserves experience, add a simple blanching step: Place the washed figs in a large glass bowl, pour 2 quarts of boiling water over them, and let them stand for 15 minutes. After soaking, drain and rinse them with cold water, which helps lock in that sweet, juicy texture.
Blanching offers a few bonuses:
- Softens the skin for a smoother preserve
- Removes some bitterness
- Helps the figs keep their shape when cooked
Now your figs are ready for the next stage. If this is your first time making fig preserves, these easy steps will help you feel like a pro from the start.
For more advice about canning techniques, check out Water Bath Canning vs Pressure Canning for tips to choose the best canning method when you’re preserving fruits at home.
Traditional Fig Preserves Recipe: Step-by-Step Guide
Let’s walk through exactly how to create that cozy, old-fashioned fig preserves recipe you remember from grandma’s kitchen. With a bit of patience and a few classic tricks, your homemade fig preserves will have just the right balance of sweetness, texture, and preserve-worthy flavor. Use this method for a fig preserves recipe for canning that delivers on taste and keeps those figs looking beautiful in the jar.
Cooking the Fig Preserves
Getting the best fig preserves is all about timing and technique. Here’s expert advice to help you lock in the right results every time:
- Peel your lemon and thinly slice the pieces.
- Combine sugar, lemon peel, bottled lemon juice, and 1 quart of water in a large stainless steel pot.
- Bring the mixture to a boil, stirring until the sugar dissolves. Boil for 10 minutes.
- Remove from the heat and skim off the foam from the top of the syrup.
- Remove lemon peel and discard.
- Put the pot back on the stove on high heat. Cook figs in the syrup one layer at a time over high heat until the figs are transparent. Remove the figs and place them in a shallow pot.
- Boil the syrup until it is thick. Pour the syrup over the figs and put them in the refrigerator for 6 to 8 hours.
Common Problems and Troubleshooting
Homemade fig preserves are simple, but even pros run into surprises. Solve the most common problems and keep your canned fig preserve recipe looking and tasting its best:
- Runny preserves: Often, the syrup hasn’t been cooked long enough. Return the syrup to a boil and simmer until it thickens before adding it back to your figs. Maintaining a 10-minute hard boil after dissolving sugar ensures a good set.
- Overly thick or hard preserves: Heavy-handed sugar or overcooking leads to thick, sticky preserves. Thin them by stirring in a small splash of hot water and gently reheating. Next time, cook the syrup just until thickened, not stiff.
- Whole figs falling apart: Figs might break down if overcooked or stirred too much. To keep them whole, cook in single layers, handle gently, and skip any unnecessary stirring.
- Cloudy syrup or grainy texture: This can happen if sugar hasn’t dissolved fully or if there’s too much foam left on top. Skim foam carefully and make sure to dissolve sugar completely before moving to the boil.
Stay patient and attentive, little details make all the difference for that bright, glossy finish and satisfying spread. For even more safe canning tips, learn about how water bath canning ensures food safety so your homemade fig preserves last all year long.


Canning Your Fig Preserves Safely
Canning is a tried-and-true way to keep your homemade fig preserves safe and shelf-stable, so you can enjoy that sweet, summery flavor year-round. With a few simple steps and the right supplies, you’ll lock in freshness and create a canned fig preserve recipe that brings back those old-school, comforting tastes.
Preparing Jars and Canner
Clean jars and lids with warm, soapy water. Ensure the jars do not have any chips or bubbles in the glass.
Prepare your canner
Using Water Bath Canner:
Put your water bath canner on your stove. Add your canning rack to the water bath canner. Add your 1/2 pint jars to the water bath canner. They will warm as you heat the water. Add enough water to cover jars with at least 2-3 inches of water. Start to bring your water to a boil.
Using a Steam Canner:
Put your steam canner on your stove. Add the steam canner rack to the bottom of the steam canner. Add the recommended amount of water to the steam canner according to the manufacturer. Add your 1/2 pint jars to the steam canner. Put the lid on your steam canner and start your stove. The jars will warm as you heat your steam canner.
Filling Your Jars with Fig Preserves
Reheat the figs and syrup to a boil over high heat. Remove from heat and skim foam from preserves if necessary.
Once you have hot jars and hot preserves.
Water Bath Canner:
Remove your jars from the water bath canner one at a time using your jar lifter. Dump the water out of the jar into your water bath canner to ensure there is still 2-3 inches of water above your jars.
Steam Canner:
Remove the steam canner lid and remove your jars one at a time using your jar lifter.
Ladle hot preserves into hot jars, leaving 1/4 inch (.5 cm) headspace (Check with headspace measurer). Remove air bubbles with a de-bubbler and adjust the headspace by adding more hot preserves if necessary.
Wipe the rim to ensure a good seal is made with the lid. Center the lid on the jar and screw the band down to fingertip tight.
Processing Jars of Fig Preserves
Water Bath Canner:
Lower the water bath canner rack into the boiling water. Ensure your jars are covered by at least 2 inches of water.
If your water is not boiling, start your processing time when the water is boiling. Process 1/2 pint jars for 10 minutes. Make sure to adjust your time for altitude.
Set a timer, it makes it much easier to make sure you process for the correct time. When your timer goes off, turn off the heat and remove the canner lid.
Leave the jars in the water for 5 minutes.
Steam Canner:
Put the lid on the steam canner. Turn your stove on high until your steam canner water comes to a vigorous boil. Continue heating so the indicator is in the correct “Zone” per your altitude.
Start your processing time when the needle reaches the maximum point you have tested your steam canner to reach in your “Zone”.
Adjust the burner so that it maintains an even rolling boil throughout the entire processing time. Usually, this will be much lower than where it was set for the vigorous boil. If the top lid is lifting and/or spitting water from the edges, this is an indication that you have the heat turned up too high. Slowly reduce the heat until this stops. Watch the indicator to ensure the temperature does not decrease.
The processing times for steam canning are the same as for water bath canning. Process 1/2 pint jars for 10 minutes.
Make sure to adjust your time for altitude. Set a timer, it makes it much easier to make sure you process for the correct time.
When your timer goes off, turn off the heat and let the canner stand for 5 minutes with the lid on before removing the jars. The lid MUST remain ON the canner during this time. This cool-down period is necessary to ensure the jar contents are properly processed.
Carefully remove the lid by tilting it away from you to avoid steam burns.
Storage Tips and Shelf Life for Canned Fig Preserves
Once your fig preserves are sealed and cooled, storing them properly can make all the difference. The way you keep your jars after canning impacts both their safety and flavor over time.
Start by setting your sealed jars on a towel or rack to cool for up to 24 hours. When they’re completely cool, double-check that each lid has sealed. Any unsealed jars should go straight into the fridge or reprocessed with a new lid.
For the best shelf life and taste:
- Keep jars in a cool, dark spot. A pantry or cupboard away from heat and direct sunlight is perfect.
- Aim for steady temperatures, not too hot or cold. Consistent temps protect both texture and flavor.
- Label every jar with the recipe name and date. This helps you use the oldest jars first and remember your favorite versions.
A properly sealed batch can last up to a year or longer, but homemade fig preserves are best used within 12 months for peak quality.


Creative Ways to Enjoy and Use Fig Preserves
Fig preserves pack a unique, old-fashioned sweetness that can transform many dishes. If you’ve just finished your batch using the best fig preserves recipe, you’re in for a treat that goes far beyond simple toast. With a few clever ideas, your homemade fig preserves can become the star in both savory and sweet recipes around the kitchen. Let’s explore the favorite ways home preservers love to use every jar.
Spread It, Top It, Mix It
The easiest way to show off your fresh fig preserves is to use them as a flavorful spread. They are so much more than a quick toast topping. Here are some go-to ideas:
- Spread on warm biscuits or scones for a classic Southern treat.
- Dollop on pancakes, waffles, or French toast in place of syrup.
- Layer on a cheese board with brie, goat cheese, or sharp cheddar for a sweet-savory combo.
- Swirl into oatmeal or yogurt for breakfast that feels special.
- Top vanilla ice cream or cheesecake with a spoonful for a sweet twist.
Each method lets you taste the fig preserving recipe’s old-fashioned charm while mixing up the usual breakfast or snack routine.
Bake with a Figgy Twist
Your homemade fig preserves shine in baking recipes. Add them to homemade bars or cakes for comfort food that feels like family. You might try:
- Filling thumbprint cookies with fig preserves instead of the usual jam.
- Swirling into pound cake or coffee cake batter before baking.
- Layering between cake or tart shells for figgy dessert bars.
- Adding to muffin batter for tender, fruity bites.
You can swap out the filling in many classic dessert recipes to add a homemade fig flavor.
Add a Sweet-Savory Touch to Meals
Did you know that a jar of this whole fig preserve recipe can unlock new flavors in your everyday meals? Figs make a wonderful glaze or sauce base:
- Glaze roasted pork or chicken with a mix of fig preserves and mustard.
- Stir into pan juices for a simple sauce with balsamic vinegar and herbs.
- Spread on sandwiches or burgers for a gourmet upgrade, try it with turkey, ham, or grilled cheese.
- Serve alongside grilled sausages or roasted veggies for an extra layer of flavor.
This sweet-savory teamwork is what makes fig preserves a year-round pantry favorite.
Homemade fig preserves let you capture the taste of summer in every jar, with bright, sweet figs ready for breakfast or special meals all year long. By following a traditional fig preserves recipe and safe canning tips, you get a shelf-stable treat that’s perfect for sharing or gifting. Canned fig preserve recipes also open up chances to try new flavors or mix up techniques, so every batch can reflect your personal touch.
Recipe Card
Fig Preserves Recipe
Equipment
- Water kettle optional
- Water Bath Canner or Steam Canner
- Steam Canner or Water Bath Canner
Ingredients
- 2 Quarts Figs
- 2 Quarts Boiling Water
- 2 2/3 Cups Granulated Sugar
- 1 Quart Water
- 1 lemon peel, thinly sliced
- 3 Tbsp Bottled Lemon Juice
Instructions
- Bring 2 Quarts of water to a boil. I use a water kettle to make this quicker.
- Wash figs and lemon under cold running water, then drain.
- Add figs to a large glass bowl. Pour 2 quarts of boiling water over figs.
- Let figs stand in the boiling water for 15 minutes. Drain the boiled water. Rinse figs under cold water and drain.
- Peel your lemon and thinly slice the pieces.
- Combine sugar, lemon peel, bottled lemon juice, and 1 quart of water in a large stainless steel pot.
- Bring the mixture to a boil, stirring until the sugar dissolves. Boil for 10 minutes.
- Remove from the heat and skim off the foam from the top of the syrup.
- Remove lemon peel and discard.
- Put the pot back on the stove on high heat. Cook figs in the syrup one layer at a time over high heat until the figs are transparent. Remove the figs and place them in a shallow pot.
- Boil the syrup until it is thick. Pour the syrup over the figs and put them in the refrigerator for 6 to 8 hours.
- Clean jars and lids with warm, soapy water. Ensure the jars do not have any chips or bubbles in the glass.
- Prepare your cannerUsing Water Bath Canner: Put your water bath canner on your stove. Add your canning rack to the water bath canner. Add your 1/2 pint jars to the water bath canner. They will warm as you heat the water. Add enough water to cover jars with at least 2-3 inches of water. Start to bring your water to a boil.Using a Steam Canner: Put your steam canner on your stove. Add the steam canner rack to the bottom of the steam canner. Add the recommended amount of water to the steam canner according to the manufacturer. Add your 1/2 pint jars to the steam canner. Put the lid on your steam canner and start your stove. The jars will warm as you heat your steam canner.
- Reheat the figs and syrup to a boil over high heat. Remove from heat and skim foam from preserves if necessary.
- Once you have hot jars and hot preserves.Water Bath Canner:Remove your jars from the water bath canner one at a time using your jar lifter. Dump the water out of the jar into your water bath canner to ensure there is still 2-3 inches of water above your jars.Steam Canner:Remove the steam canner lid and remove your jars one at a time using your jar lifter.
- Ladle hot preserves into hot jars, leaving 1/4 inch (.5 cm) headspace (Check with headspace measurer). Remove air bubbles with a de-bubbler and adjust the headspace by adding more hot preserves if necessary.
- Wipe the rim to ensure a good seal is made with the lid. Center the lid on the jar and screw the band down to fingertip tight.
- Water Bath Canner:Lower the water bath canner rack into the boiling water. Ensure your jars are covered by at least 2 inches of water.If your water is not boiling, start your processing time when the water is boiling. Process 1/2 pint jars for 10 minutes. Make sure to adjust your time for altitude.Set a timer, it makes it much easier to make sure you process for the correct time. When your timer goes off, turn off the heat and remove the canner lid.Leave the jars in the water for 5 minutes.Steam Canner:Put the lid on the steam canner. Turn your stove on high until your steam canner water comes to a vigorous boil. Continue heating so the indicator is in the correct "Zone" per your altitude. Start your processing time when the needle reaches the maximum point you have tested your steam canner to reach in your "Zone".Adjust the burner so that it maintains an even rolling boil throughout the entire processing time. Usually, this will be much lower than where it was set for the vigorous boil. If the top lid is lifting and/or spitting water from the edges, this is an indication that you have the heat turned up too high. Slowly reduce the heat until this stops. Watch the indicator to ensure the temperature does not decrease.The processing times for steam canning are the same as for water bath canning. Process 1/2 pint jars for 10 minutes.Make sure to adjust your time for altitude. Set a timer, it makes it much easier to make sure you process for the correct time.When your timer goes off, turn off the heat and let the canner stand for 5 minutes with the lid on before removing the jars. The lid MUST remain ON the canner during this time. This cool-down period is necessary to ensure the jar contents are properly processed.Carefully remove the lid by tilting it away from you to avoid steam burns.
- Using your jar lifter, carefully move the jars onto a wire rack or kitchen towel to allow them to cool. When moving the jars, try not to tilt them to the side, as this could affect the seal of the jars. Allow your jars to cool for 12-24 hours before handling.
- Once cool, remove the canning rings from the jars. Wash your jars off to ensure no food residue is on the outside of the jars from processing. Label your jar with the name of the recipe and date. This will help you remember what recipe you used to can, and the date will allow you to use the oldest canned goods first.