

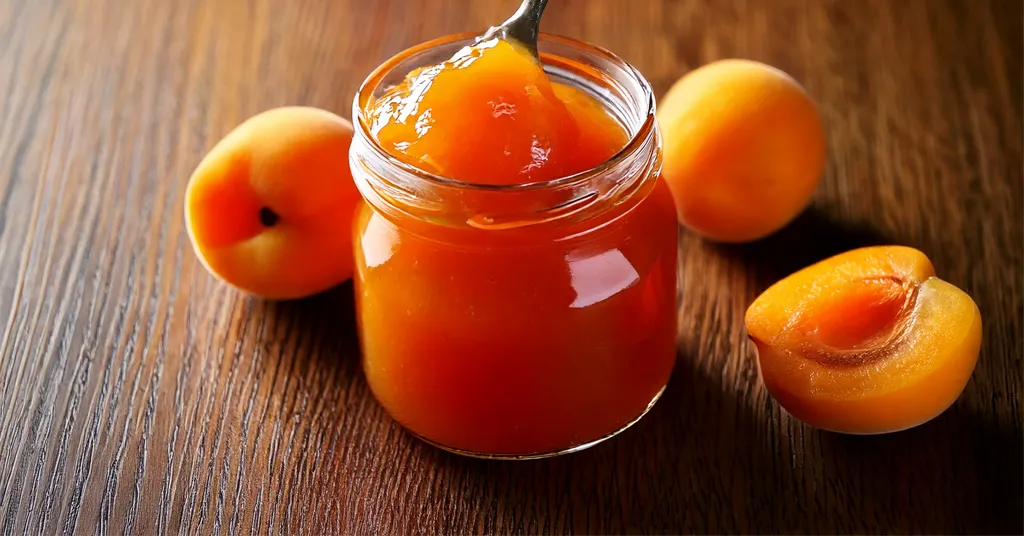
There’s nothing quite like the taste of this homemade apricot jam recipe. It’s sweet, tangy, and perfect for spreading on toast, topping desserts, or even stirring into yogurt. Making your jam at home isn’t just rewarding—it’s surprisingly simple. This recipe helps you create a delicious, old-fashioned apricot jam that captures the season’s best flavors.
Why Apricot Jam Stands Out
Apricot jam has a unique balance of sweetness and tanginess that makes it different from other fruit preserves. Unlike commercial varieties that often include unnecessary additives, making your apricot jam means you get to control every ingredient.
What makes apricots so perfect for jam? They naturally contain enough pectin to thicken beautifully without the need for commercial pectin.
Essentials for the Delicious Apricot Jam Recipe
While the ingredients are simple, getting apricot jam just right takes a few key techniques. Here’s what you need to know:
- Ripeness Matters: Use fully ripe apricots for the best flavor and softness. Overripe fruit works just fine, but avoid anything too bruised or spoiled.
- Minimal Ingredients: Stick to just apricots, sugar, and a bit of lemon juice for a straightforward recipe.
- Timing Is Everything: Cook too quickly, and you risk scorching the sugars. Go too slow, and you might end up with a runny consistency. It’s all about finding that perfect balance.
For those who are new to canning, understanding the difference between jams, jellies, and preserves can be a helpful starting point. Check out Jam vs Jelly vs Preserves: What’s the Difference? for more insights to sharpen your skills.

Ingredients and Essential Tools for Apricot Jam
Crafting delicious apricot jam at home starts with just a few simple ingredients and the right tools to make the job smooth and enjoyable. Every choice you make, from the apricots you use to the jars, impacts the quality of your final product. Here’s what you need to succeed. This recipe comes from the Ball Complete Book of Home Preserving and will yield about 9 half-pint jars of Apricot Jam.
Ingredients for Apricot Jam Recipe
To make the perfect Apricot Jam Recipe, you’ll need the following ingredients:
- 8 cups of peeled, pitted, and chopped apricots: You’ll want sweet, ripe apricots that are easy to handle and full of flavor.
- 4 Tbsp bottled lemon juice: This isn’t just for taste—it’s a key ingredient to balance acidity and help your jam set properly.
- 6 cups granulated sugar: Jam needs sugar not only for sweetness but also as a natural preservative to maintain freshness and prevent spoilage.

Choosing the Best Apricots
Selecting your apricots is one of the most important steps for making your jam shine. Fresh, ripe apricots give your jam its vibrant color and rich flavor. But how do you pick the perfect ones?
Look for apricots that are plump, firm yet slightly soft to the touch, and free of major blemishes. The best apricots for jam will have a deep orange color and a fragrant, sweet aroma. If you’re shopping at a farmer’s market or produce stand, don’t hesitate to ask for a taste—knowing the level of sweetness helps you anticipate how your jam will turn out.
Avoid underripe apricots because they can make the jam too tart. Overripe or very soft apricots are fine as long as they aren’t moldy or overly bruised, but use them quickly, as they can spoil fast. If you love apricots as much as I do, you’ll appreciate turning this fruit into delicious jam.
Tools Required for this Apricot Jam Recipe
Having the right tools on hand is crucial to ensure your jam-making process is smooth and frustration-free. These tools not only save time but also ensure your Homemade Apricot Jam Recipe comes out perfectly every time:
Must-Have Tools:
- Water Bath Canner or Steam Canner: These are essential for processing and sealing your jars safely, especially when making high-acid recipes like jams. Learn more about why these canners are vital at Water Bath Canning Supplies.
- Sharp Knife and Cutting Board: Prepping your apricots is easier and safer with a sturdy cutting surface and a quality knife.
- Vegetable Peeler: Makes peeling a breeze, particularly for those who want smooth-textured jam.
- Large Stainless Steel Pot: A heavy-bottomed, non-reactive pot ensures even cooking and prevents scorching.
- Measuring Cups and Measuring Spoons: Precision matters when it comes to jam recipes, especially sugar and lemon juice measurements.
- Canning Jars (1/2 Pint), Lids, and Bands: Opt for high-quality, clean jars to keep your jam fresh for months.
- Ladle and Funnel: These make transferring hot jam into jars neat and efficient.
- Jar Lifter and Headspace Measurer/De-bubbler: These handy tools help ensure your jars are filled to the correct level and sealed properly without trapped air bubbles.
When you’ve got your ingredients and tools set up, the whole process becomes not only manageable but enjoyable. If you’re new to canning or want to brush up on technique, I recommend reading How Water Bath Canning Keeps Your Food Safe for essential safety tips and guidance.
Step-by-Step Apricot Jam Recipe
Making homemade apricot jam may seem intimidating at first, but it’s a straightforward process when you break it into clear steps.
Preparing Jars and Canner
Getting your jars and canning equipment ready is the foundation of successful jam-making. Cleanliness is non-negotiable here—starting with spotless jars and lids ensures your apricot jam stays fresh and safe.
- Cleaning Your Jars: Wash your jars and lids thoroughly in warm, soapy water. Check the jars carefully for chips or cracks—they must be flawless to seal properly. Rinse well and set them on a clean towel to air dry.
Prepare Your Canner
Depending on the method you’re using, the setup will vary. Choose between a water bath canner or a steam canner to safely process your jam.
- Using a Water Bath Canner:
- Place your water bath canner on the stove and add the canning rack.
- Insert the 1/2 pint jars into the canner. The heat from the water will warm the jars, preventing sudden temperature changes.
- Add enough water to cover the jars with at least 2–3 inches. Start bringing the water to a boil as you work through the next steps.
- Using a Steam Canner:
- Position the steam canner on your stove and fit the steam canner rack at the bottom.
- Add water just below the rack level, as recommended by the canner’s instructions.
- Place your jars inside, put the lid on, and start heating. The jars will warm up as the steam increases.
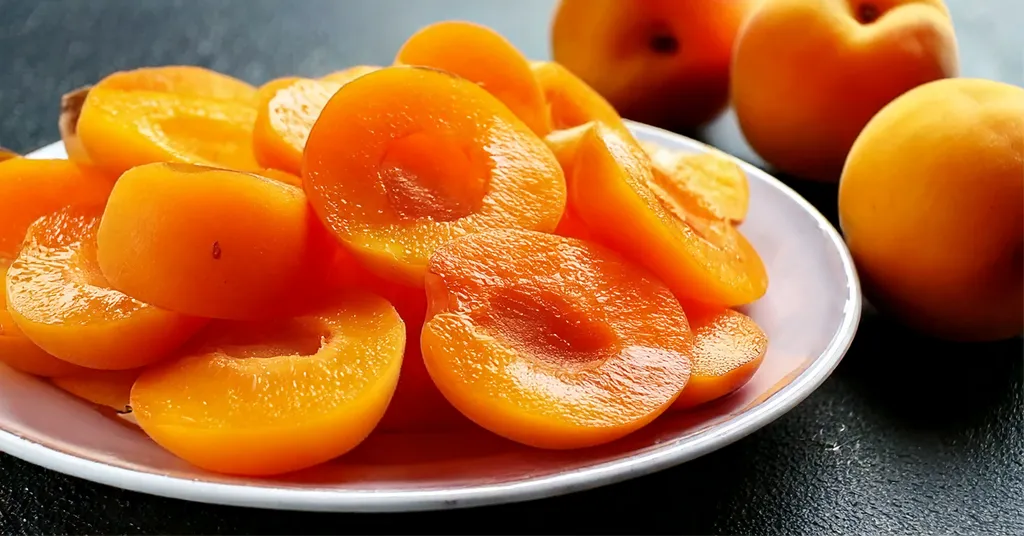
Preparing the Apricots
This might just be my favorite step—working with fresh, juicy apricots. If you’ve never prepped apricots before, don’t worry. Here’s everything you need to know to get started.
- Peel the apricots. Peeling gives a smoother jam texture.
- Pit and Chop: Split each apricot in half and remove the pit. Once pitted, chop the apricots into small pieces.
- Measuring: After preparation, your apricots should measure out to 8 full cups. This will ensure the right balance for the recipe.
Pro Tip: Use ripe but firm apricots for the best flavor. Avoid underripe fruit, as it can leave your jam tart and less sweet.
Cooking the Jam
The cooking process is where the magic happens, transforming fresh apricots into a rich, golden jam.
- In a large stainless steel pot, combine 8 cups of apricots, 4 tablespoons of bottled lemon juice, and 6 cups of granulated sugar.
- Heat the mixture over medium heat. Stir constantly to dissolve the sugar—burnt sugar ruins all the hard work you’ve done so far!
- Bring the mixture to a boil and continue boiling, stirring frequently, until it thickens. Keep an eye on the temperature and aim for 220℉ (104℃), measured using a candy thermometer.
Testing the Gel Set
Use the cold spoon method to check if your jam has reached the desired consistency:
- Dip a chilled metal spoon into the boiling jam mixture.
- Lift it horizontally and let the jam run off. When the drops combine and sheet off in one motion, your jam is ready!
Remove the pot from heat and skim any foam off the surface.
Processing Apricot Jam Recipe
Once your jam is hot and ready, it’s time to process it and store it properly. This step is crucial for long-term preservation and food safety.
- Fill Your Jars: Using your canning funnel and ladle, pour hot jam into your hot jars, leaving 1/4 inch of headspace. Remove air bubbles with a de-bubbler and re-check the headspace.
- Seal the Jars: Wipe the jar rims to remove any jam residue. Center lids on jars and screw bands on to fingertip tightness.
Canning Methods
- Water Bath Canner:
- Lower the filled jars into the boiling water using the canning rack. The jars must be fully submerged with at least 2 inches of water above them.
- Process for 10 minutes (adjust for altitude). Once done, turn off the heat and let the jars sit in the water for 5 minutes before removing.
- Steam Canner:
- Place the lid on your steam canner and heat until the needle indicates the correct zone for your altitude.
- Process for 10 minutes (adjust for altitude) while maintaining steady steam. When done, turn off the heat and let the canner sit with the lid on for 5 minutes.
After processing, use a jar lifter to transfer jars to a kitchen towel or wire rack. Avoid tilting the jars to prevent breaking the seals. Allow jars to cool undisturbed for 12–24 hours. For more on canning safety, check out Safe and Tested Canning Resources.
Once cooled, remove the bands, wash the jars to remove any residue, and label them with the date. Your Apricot Jam Recipe for Canning is now a delectable homemade preserve you can enjoy year-round!

Tips for Perfect Apricot Jam Every Time
Making apricot jam is as much about skill as it is about choosing the right fruit and tools. Even when you follow a recipe to the letter, small missteps can impact the final result. Let’s address those common issues so that every batch turns out perfectly.
Preventing Common Mistakes
Even experienced home preservers occasionally encounter challenges when making apricot jam. But understanding why things go wrong can help ensure smooth sailing from start to finish. Here are some common pitfalls—and how to avoid them:
Runny Jam
There’s nothing more frustrating than opening a jar of jam only to find it hasn’t set properly. Here are a few tips to avoid this issue:
- Measure Ingredients Precisely: Always stick to the recommended sugar-to-fruit ratio. Skimping on sugar can leave you with a soupy mixture since sugar plays a key role in thickening.
- Cook to the Right Temperature: You need to cook your jam until it reaches 220°F (104°C) on a candy thermometer. This temperature ensures the perfect gel set.
- Test the Gel Set: Use the cold plate or cold spoon method to check if your jam is ready before removing it from heat.
- Patience Pays Off: Sometimes, runny jam will thicken after 24–48 hours of cooling and setting in the jars. Don’t rush to reprocess right away.
Overly Thick Jam
On the other end of the spectrum, jam that hardens too much can feel more like sticky candy than a spread. Here’s how to avoid it:
- Don’t Overcook: Heating your jam for too long can evaporate too much liquid, leaving you with an excessively thick or rubbery texture. Keep a close eye on it when it starts to approach the gel stage.
Burning or Sticking
Nothing ruins a batch quicker than burnt jam, leaving an odd taste and making cleanup a nightmare. To prevent this:
- Stir Often: Never let your jam sit unattended on the stove. Stir constantly, especially as it thickens.
- Use the Right Pot: A wide, heavy-bottomed pan ensures even heating and reduces the risk of scorching.
- Keep the Heat Moderate: Resist the urge to crank up the heat for faster results—it’ll likely scorch the sugar and ruin the entire batch.
Correcting mistakes takes time, but following these tips should help you make apricot jam that’s every bit as delightful as you imagine.
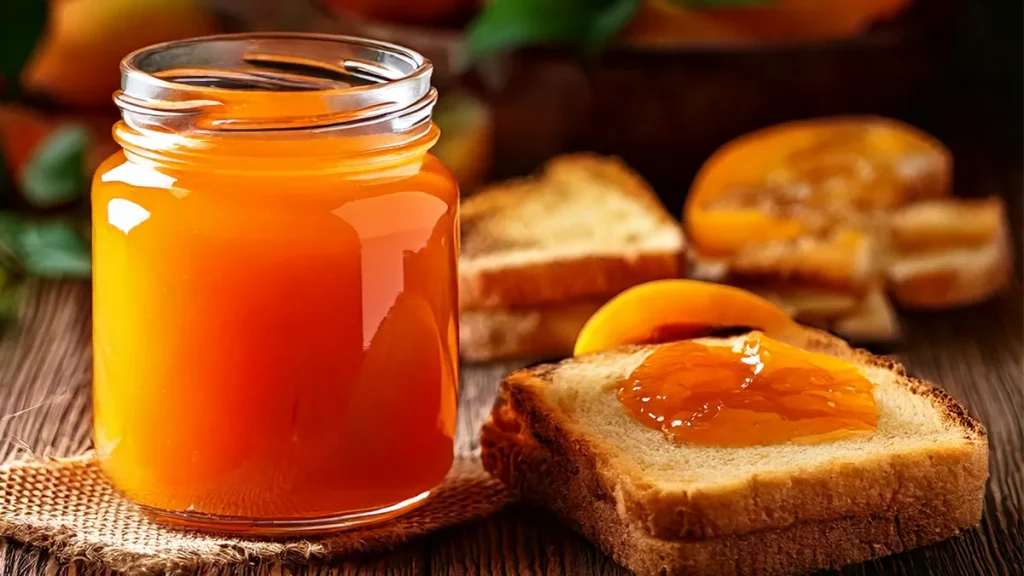
Creative Ways to Use Apricot Jam
Apricot jam is one of those kitchen essentials that goes beyond the basics of spreading it on toast. Its sweet and tangy nature makes it a versatile ingredient in your pantry.
Pairing with Breakfast
Breakfast becomes something special when you bring apricot jam into the mix. Think of it as your go-to option for a little extra flavor and vibrancy on your plate.
- Bread and Toast: A warm slice of buttered toast is made even better with a generous smear of apricot jam. The sweet-tart hint pairs especially well with hearty whole-grain loaves or buttery croissants.
- Pancakes and Waffles: Skip the syrup once in a while and drizzle warm apricot jam over your pancakes or waffles instead. The jam’s bright flavor cuts the richness, creating a balanced and delightful bite every time.
- Yogurt Bowls: Stir a spoonful of apricot jam into plain Greek yogurt for an instant flavor boost. Add granola or fresh fruit to complete the bowl – it’s easy, healthy, and so good.
Want ideas for stocking up your pantry with homemade or preserved items to pair alongside apricot jam? Check out How to Can Apple Jelly for more ways to enjoy homemade spreads and elevate your breakfasts easily.
Incorporating this Apricot Jam Recipe into Desserts
Apricot jam truly shines when it comes to desserts, adding not just flavor but also moisture and texture.
- Spread for Cookies: Use apricot jam as a filling for thumbprint cookies. Its slightly tangy sweetness balances the buttery richness of the cookie dough to perfection.
- Glaze for Cakes: Brushing apricot jam over sponge cakes or as a layer beneath fondant adds a glossy finish and keeps the cake moist.
- Fruit Tart Base: Replace traditional custards or creams with a layer of apricot jam in your fruit tarts. It gives a subtle sweetness that enhances the flavor of the fresh fruit on top.
If you’re baking for a family dinner or whipping something up just for yourself, apricot jam is your secret ingredient to making desserts unforgettable.
Other Jam Recipes
Looking for some additional Jam Recipes for Canning? I have you covered.
Recipe Card
Apricot Jam Canning Recipe
Equipment
- Water Bath Canner or Steam Canner
- Steam Canner or Water Bath Canner
Ingredients
- 8 Cups chopped pitted peeled Apricots
- 4 Tbsp Bottled Lemon Juice
- 6 Cups Granulated Sugar
Want to Save this Recipe?
Instructions
- Clean jars and lids with warm soapy water. Ensure the jars do not have any chips or bubbles in the glass.
- Peel, chop, and pit the apricots to measure 8 cups.
- Prepare your cannerUsing Water Bath Canner: Put your water bath canner on your stove. Add your canning rack to the water bath canner. Add your 1/2 pint jars to the water bath canner. They will warm as you heat the water. Add enough water to cover jars with at least 2-3 inches of water. Start to bring your water to a boil.Using a Steam Canner: Put your steam canner on your stove. Add the steam canner rack to the bottom of the steam canner. Add the recommended amount of water to the steam canner according to the manufacturer. Add your 1/2 pint jars to the steam canner. Put the lid on your steam canner and start your stove. The jars will warm as you heat your steam canner.
- Combine apricots, lemon juice, and sugar in a large, deep stainless steel pot.
- Bring to a boil over medium heat, stirring constantly to dissolve the sugar. Boil, stirring frequently, until the mixture thickens. Bring the apricot jam mixture to 220℉ (104℃). Measure with a candy thermometer inserted vertically into the jam without contacting the surface of the pot.
- Test Gel Set – Dip a cold metal spoon into the boiling jam. Lift the spoon and hold it horizontally and edge down so that the jam runs off the edge. As the jam cooks, the drops will become heavier and will drop off the spoon separately but two at a time. When the two drops join together and "sheet" off the spoon, the gel stage has been reached. Sheeting (gel stage) jam breaks from the spoon in a sheet or flake.
- Remove from the heat and skim off the foam from the top of the jam.
- Once you have hot jars and hot jam.Water Bath Canner:Remove your jars from the water bath canner one at a time using your jar lifter. Dump the water out of the jar into your water bath canner to ensure there is still 2-3 inches of water above your jars.Steam Canner:Remove the steam canner lid and remove your jars one at a time using your jar lifter.
- Ladle hot jam into hot jars, leaving 1/4 inch (.5 cm) headspace (Check with headspace measurer). Remove air bubbles with a de-bubbler and adjust the headspace by adding more hot jam if necessary.
- Wipe the rim to ensure a good seal is made with the lid. Center the lid on the jar and screw the band down to fingertip tight.
- Water Bath Canner:Lower the water bath canner rack into the boiling water. Ensure your jars are covered by at least 2 inches of water.If your water is not boiling start your processing time when the water is boiling. Process 1/2 pint jars for 10 minutes. Make sure to adjust your time for altitude.Set a timer, it makes it much easier to make sure you process for the correct time. When your timer goes off turn off the heat and remove the canner lid.Leave the jars in the water for 5 minutes.Steam Canner:Put the lid on the steam canner. Turn your stove on high until your steam canner water comes to a vigorous boil. Continue heating so the indicator is in the correct "Zone" per your altitude. Start your processing time when the needle reaches the maximum point you have tested your steam canner to reach in your "Zone".Adjust the burner so that it maintains an even rolling boil throughout the entire processing time. Usually, this will be much lower than where it was set for the vigorous boil. If the top lid is lifting and/or spitting water from the edges this is an indication that you have the heat turned up too high. Slowly reduce the heat until this stops. Watch the indicator to ensure the temperature does not decrease.The processing times for steam canning are the same as for water bath canning. Process 1/2 pint jars for 10 minutes.Make sure to adjust your time for altitude. Set a timer, it makes it much easier to make sure you process for the correct time.When your timer goes off turn off the heat and let the canner stand for 5 minutes with the lid on before removing the jars. The lid MUST remain ON the canner during this time. This cool-down period is necessary to ensure the jar contents are properly processed.Carefully remove the lid by tilting it away from you to avoid steam burns.
- Using your jar lifer carefully move the jars onto a wire rack or kitchen towel to allow them to cool. When moving the jars try not to tilt them to the side as this could affect the seal of the jars. Allow your jars to cool for 12-24 hours before handling.
- Once cool, remove the canning rings from the jars. Wash your jars off to ensure no food residue on the outside of the jar from processing. Label your jar with the name of the recipe and date. This will help you remember what recipe you used to can and the date will allow you to use the oldest canned goods first.


I followed the recipe and the jam is phenomenal. Refrigerating before use gives it that extra little thickness.
I am so glad you love it!