

There’s nothing quite like the taste of homemade peach jelly made with ripe, sun-kissed peaches at their peak. Every summer, I look forward to making a peach jelly recipe that’s simple, bright, and full of fresh flavor. The best peach jelly recipe starts with high-quality fruit, so picking the sweetest peaches gives you the biggest reward.
If you love a classic canned peach jelly recipe or want to try a fresh peach jelly recipe, making your own is satisfying and budget-friendly. I’m excited to walk you through this process so you can savor homemade peach jelly long after peach season has passed. If you’re curious about other fruit spreads, try checking out How to Can Apple Jelly for more inspiration.
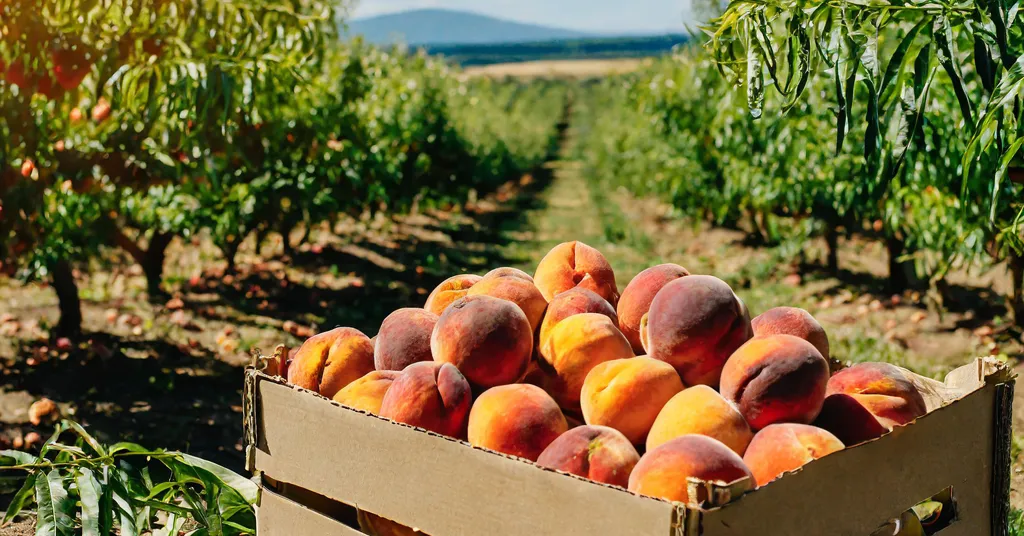
Choosing and Preparing Peaches for Jelly
Getting your peaches right is the secret to a peach jelly recipe that tastes just like summer. Picking and prepping the fruit is where so much of the flavor comes from. If you’ve ever wondered why some jars taste so much better than others, it usually comes down to starting with the best peaches and treating them with a little extra care during prep. This recipe comes from The Ball Complete Book of Home Preserving and will yield about 5 half pint jars of peach jelly.
How to Select the Best Peaches
For this peach jelly recipe with pectin, start with ripe, yellow, fragrant peaches. They shouldn’t be too hard or overly squishy. A gentle squeeze should give just a bit, and the skins should glow with rich color and a little natural fuzz.
When I pick peaches for canning peach jelly or a fresh peach jelly recipe, I look for:
- Sweet aroma: Ripe peaches smell sweet and fruity at the stem end.
- Softness: They should be firm but yield slightly to pressure.
- No green patches: This means they finished ripening on the branch.
- Minimal blemishes: Skip any that have dark spots, mold, or deep bruises.
If you can, buy your peaches from a local farmer or pick them yourself. The fresher they are, the better your homemade peach jelly will taste. Using perfectly ripe fruit is key to any easy peach jelly recipe.
Choosing Safe Peaches for Canning
When making peach jelly for canning, always use yellow peaches. Yellow peaches are high enough in acidity to make safe, shelf-stable preserves. White peaches do not have enough natural acid to meet safe canning standards, even if you add lemon juice or extra acid. For this reason, never use white peaches in canning recipes. Sticking to yellow peaches protects your family and ensures your homemade peach jelly is both delicious and safe to store.
Prepping Peaches for Jelly Making
Home food preservers know that prep work matters. Here are the steps I follow every time:
- Wash the peaches well. Even if you plan to strain the juice, scrub the skins to remove dirt and pesticides.
- Cut and pit the fruit. Slice peaches in half, then twist to separate and remove the pit. If the peaches are super ripe, this should take just a few gentle turns. Cut your half peaches into quarters.
- Don’t peel unless needed. The skin holds flavor and beautiful color. You’ll strain it after simmering, so peeling isn’t required.
If your peaches seem a bit under-ripe, put them in a paper bag with an apple overnight to ripen them up. Overripe or mealy peaches can make the juice cloudy or flat, so save those for pies or smoothies.
Choosing the right fruit and prepping it with care really sets the tone for everything that comes next in your Ball peach jelly recipe. If you’re curious about safe canning methods after picking the perfect peaches, check out the difference between Water Bath Canning and Pressure Canning. It’s a good read for home canners looking to expand their pantry.
Essential Equipment and Ingredients for Peach Jelly
Before you get started with any peach jelly recipe for canning, having the right tools and quality ingredients makes a huge difference. A well-prepped kitchen sets you up for smooth and stress-free canning, and it helps guarantee a safe result.

Must-Have Equipment for Canning Peach Jelly
Canning peach jelly doesn’t require fancy gear, but certain basics are non-negotiable. Here are the essentials I always keep within reach:
- Canning pot with a rack: A large, deep pot with a canning rack lets jars process safely. The rack keeps jars off the bottom so water can flow evenly.
- Half-pint canning jars (with lids and bands): This peach jelly recipe makes about 5 half-pint jars. New lids are a must for a safe seal, while bands and jars can be reused if they’re in good condition.
- Jar lifter and funnel: These help you move hot jars without burns and get jelly into jars cleanly. Sticky spills are way less fun to clean up later.
- Ladle and stainless steel spoon: For stirring jelly and filling jars. A ladle with a spout is extra helpful.
- Large saucepot: For cooking the peach juice and sugar with pectin. Use a non-reactive pot made of stainless steel or enameled cast iron.
- Cheesecloth or jelly bag: Crucial for straining peach juice so your homemade peach jelly stays crystal clear.
- Measuring cups and spoons: Accuracy is key, especially with pectin and sugar.
- Towels and paper towels: For wiping jar rims, cleaning drips, and setting hot jars on the counter.
Having these on hand will speed up the process and help keep your workspace organized.
Ingredients for the Best Peach Jelly Recipe
To make a truly easy peach jelly recipe, you don’t need a long list. The magic comes from top-notch fruit and just a few pantry staples.
- 3 lbs Fresh peaches: Choose ripe, juicy peaches for the brightest flavor. About 3 pounds usually gives enough juice for one batch, but always buy a couple extra in case some have bruises or pits that are hard to remove.
- 5 Cups Granulated sugar: Regular white sugar keeps the jelly clear and enhances the peaches’ natural sweetness.
- 1 package Powdered pectin (1.75 oz/49 to 57 g): This is the secret for a fail-proof, set jelly.
- 1/2 Cup Bottled Lemon juice: Acidity gives a safe, shelf-stable jelly and brightens up peach flavor.
- 1 1/2 Cups Water (1/2 cup per pound of peaches): You’ll strain juice before making the jelly, so use just enough to get things simmering.
No extra flavors or color needed—this canned peach jelly recipe lets the fruit shine. If you’re ever curious about other sweet and tangy ways to preserve summer fruit, peek at my favorite Homemade Salsa Recipes for Canning. They’re a perfect mix of sweet fruit and savory veggies for curious canners.
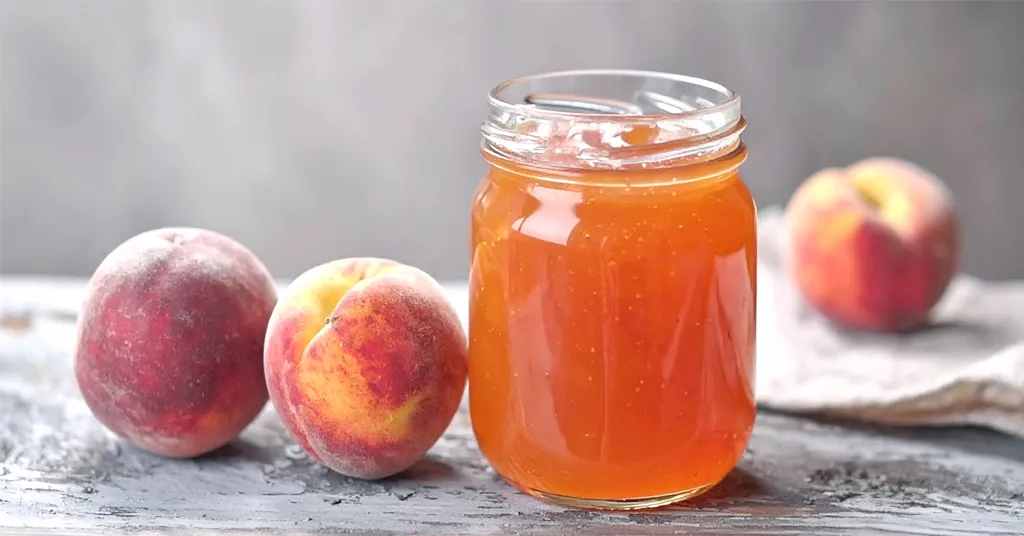
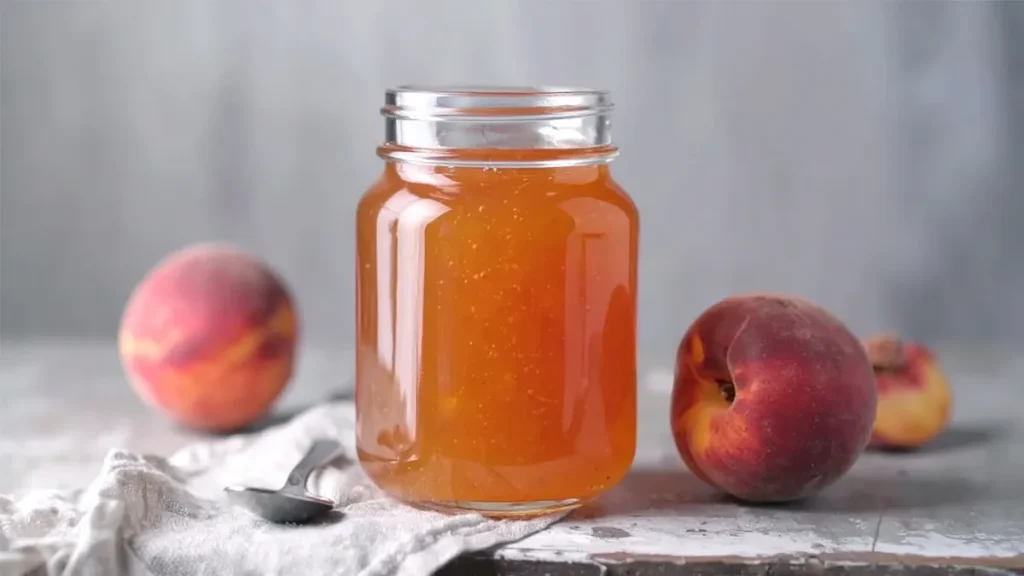
Every jar of homemade peach jelly starts with these basic tools and top-shelf ingredients. The result is a beautiful golden spread that tastes like summer mornings, ready for toast, yogurt, or straight off the spoon.
Step-by-Step Peach Jelly Recipe
Making a homemade peach jelly recipe is a classic way to capture the best of summer. This section walks you through every step, from juicing your peaches to processing jars for shelf-stable storage. If you’re a beginner canning peach jelly for the first time or a seasoned home food preserver, these directions will help you turn ripe fruit into a golden, sunny spread for your pantry. This peach jelly recipe for canning makes about five half-pint jars.
Juicing Peaches
Start by juicing fresh peaches to get the pure flavor that defines the best peach jelly recipe. Place your prepared peaches and 1 1/2 cups of water (use 1/2 cup per pound of peaches) in a large stainless steel pot or an enameled Dutch oven. Bring the mixture to a boil over high heat, stirring often to keep the fruit from sticking.
Once it hits a boil, lower the heat, cover the pot loosely, and simmer gently. Keep stirring and crush the peaches every few minutes until they soften (this takes about 20 minutes). Stop cooking as soon as the peaches are soft to protect the flavor and bright color. Overcooking will dull both the flavor and natural pectin strength, which can affect your jelly set.
Pour the peach mixture into a mesh strainer lined with three layers of damp cheesecloth set over a bowl. Let this drain for at least two hours or until you have three cups of clear juice. Try not to press or squeeze the fruit, or your jelly might turn cloudy.
Alternate Juicing Method
If you have a steam juicer, this is a reliable, hands-off way to get clear peach juice for your peach jelly recipe with pectin. Add water to the bottom of the steam juicer, stack the remaining parts, then load your washed and quartered peaches into the top section. Cover the fruit and set the heat to medium-high until the water starts boiling.
You can gently mash the steaming peaches now and then to release even more juice. Watch as the juice collects in the middle chamber. Keep juicing until you have at least three cups. This method works well for larger batches or if you want to save time.
Preparing Your Canner and Jars
Organizing your work area before you start cooking the jelly makes the process smooth. Wash jars and lids in warm, soapy water. Inspect your jars for chips, cracks, or bubbles that could cause breakage during processing.
Depending on your canning method, prepare your equipment as follows:
- Water Bath Canner: Place the rack in your canner, set it on the stove, and fill the pot with enough water to cover the filled jars by 2-3 inches. Add your jars they will heat as you warm the water. Begin heating the water so it’s ready to boil when the jelly is finished.
- Steam Canner: Set the rack in the bottom of the steam canner, add water as the manufacturer recommends, add your jars, cover, and start warming the water.
To dig deeper on why water bath canning is so effective and safe, take a look at How Water Bath Canning Keeps Your Food Safe.
Cooking Peach Jelly
Pour your peach juice into a large stainless steel pot or enameled Dutch oven. Add lemon juice for bright flavor and safe acidity. Sprinkle in your powdered pectin and whisk until dissolved.
Bring the mixture to a boil on high heat, stirring frequently. Once boiling, add all the sugar at once and stir until dissolved. Bring the mixture back to a full rolling boil, then boil hard for 1 minute while stirring constantly. Watch the bubbles rise up fast, this is the magic moment when the pectin sets.
Remove the pot from the heat. Use a spoon to skim off any foam for a clearer finish. The foam doesn’t hurt anything, but it can cause a cloudy top on your jelly.
Testing for Doneness and Troubleshooting
Once you’ve boiled your jelly for 1 minute, it’s time to check if it’s set. Use one of these quick techniques:
- Spoon or Plate Test: Drop a spoonful of hot jelly onto a chilled plate. Wait a minute, then push the jelly with your finger. If it wrinkles gently, it’s ready.
- Temperature Check: Jelly should reach 220°F at sea level. Use a candy thermometer for accuracy, especially for new canners.
- Sheet Test: Dip a cold spoon into the jelly and let it drip. If it comes off in a sheet rather than single drops, it’s set.
If your jelly seems runny as it cools, give it time, some jellies need several days to fully set. If after a week your jelly is still loose, you can remelt it, add a bit more pectin and lemon juice, and reprocess. For overcooked (rubbery) jelly, use it for stirring into oatmeal or as a sweetener for glazes.

Fill Jars with Peach Jelly
With jars hot and ready, and jelly bubbling and clear, it’s time to fill the jars. Use these tips for both water bath and steam canning:
- Water Bath Canner: Remove jars from the hot water one at a time using a canning jar lifter. Pour out any water inside each jar. They should be hot but empty and ready for filling.
- Steam Canner: Take off the lid and use your jar lifter to remove each hot jar.
Ladle the hot jelly into jars, leaving 1/4 inch headspace at the top. Wipe jar rims with a clean, damp cloth for a solid seal. Place a lid on each jar and screw the band down to fingertip tight. Repeat until all the jelly is jarred.
Carefully transfer the filled jars to your canner rack with the jar lifter, arranging them so they don’t touch.
Processing Jars in a Canner
Processing jelly is the final step for safe, shelf-stable storage. Here’s how to do it depending on your setup:
- Water Bath Canner: Lower the rack of filled jars into the boiling water, ensuring jars are covered by at least 2 inches of water. When the water returns to a hard boil, start timing—process half-pint jars for 10 minutes (adjust if you live at a higher altitude). Turn off the heat, remove the lid, and let jars sit in the hot water for 5 minutes. This helps prevent siphoning and sticking.
- Steam Canner: Place the lid on, turn up the heat, and wait for the steam indicator to reach the proper zone for your altitude. Process half-pint jars for 10 minutes once you reach the target temperature. Turn off the heat but leave the lid on for 5 minutes. Then, remove jars using the lifter and place them on a towel or rack to cool. Be careful, and avoid tipping jars.
Let your peach jelly jars cool for 12-24 hours. Once cooled, remove the bands, check seals, and wash jars. Label each jar with the name “Peach Jelly” and the date. Organized labeling saves headaches later and keeps your pantry rotation simple.
Creative Serving Suggestions for Peach Jelly
Peach jelly isn’t just for toast and peanut butter. When you fill your pantry with jars from this peach jelly recipe, you’ve got endless ways to use its sweet, summery flavor. I love dreaming up new ways to enjoy homemade peach jelly, and it’s a treat to see it surprise people outside the breakfast hour.
Breakfast Beyond Toast
Breakfast is the first place most of us reach for jelly, but why stop at plain bread? Try peach jelly in these simple ideas:
- Warm Biscuits or Croissants: Spread peach jelly on a fresh biscuit or flaky croissant. The soft bread soaks up the sweet flavor and makes every bite taste like home.
- Yogurt Parfaits: Layer peach jelly with Greek yogurt and granola. The jelly melts into ribbons and brightens each spoonful.
- Pancake and Waffle Drizzle: Warm peach jelly in the microwave (just 10 seconds), then pour it over pancakes or waffles instead of syrup.
Breakfast doesn’t have to be boring, especially with an easy peach jelly recipe on your shelf.
Cheese and Charcuterie Boards
Sweet and savory foods are a pair you can’t beat. Peach jelly stands out next to creamy cheese or salty meats. Here are a few ideas for your next board:
- Serve with Brie or Goat Cheese: Let guests spread peach jelly on crackers with brie or tangy goat cheese. The flavors balance perfectly.
- Prosciutto Wraps: Spoon a small amount onto a slice of prosciutto or smoked ham and wrap around grilled peaches or melon.
- Sharp Cheddar Pairing: Add a jar of homemade peach jelly and a knife next to a block of aged cheddar. The sweet and savory bite is so satisfying.
If you love making fruit spreads for cheese boards, you might also want to read my cherry jam recipe steps for more inspiration.
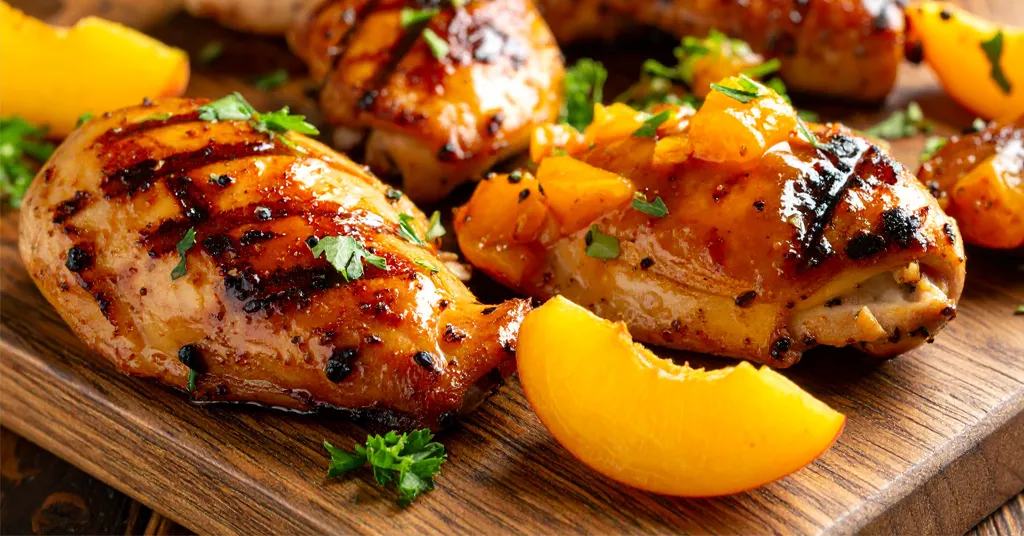
Glazes and Sauces
Homemade peach jelly isn’t just for spreading. Use it to create simple glazes and sauces, perfect for quick meals. I love using jelly as the secret weapon in my meals when I want something easy and homemade.
- Grilled Chicken or Pork Glaze: Melt peach jelly in a small saucepan, stir in a splash of soy sauce, minced garlic, and a pinch of pepper for a sweet-savory glaze.
- Roasted Vegetables Booster: Mix peach jelly with balsamic vinegar and olive oil, then drizzle over roasted carrots or sweet potatoes.
- Salad Dressing Starter: Whisk peach jelly with apple cider vinegar, a bit of Dijon mustard, and olive oil to make a quick vinaigrette.
These tricks make it easy to get more from your canned peach jelly recipe, straight from the pantry.
Sweet Treats and Desserts
Peach jelly brings summer right to your dessert table. There are so many ways to use it in sweets:
- Thumbprint Cookies: Fill thumbprint cookies with peach jelly for a pretty and delicious center.
- Cake Filling: Spread a layer of fresh peach jelly recipe between cake layers or swirl into cupcake batter before baking.
- Ice Cream Topping: Dollop a spoonful over vanilla or peach ice cream for a burst of fruit flavor.
Even the best peach jelly recipe becomes more exciting in dessert form.
Using Frozen Peaches in Peach Jelly Recipe
Many home canners like the idea of making a peach jelly recipe year-round, not just during peak peach season. The good news is, you can use frozen peaches to get almost the same sweet, fresh flavor as if you just brought them home from the orchard. If your freezer is full of summer fruit or you find a great deal at the store, using frozen peaches gives you the flexibility to can whenever works for you.
Benefits of Using Frozen Peaches
When I reach for frozen peaches in the middle of winter, I notice how well they capture the brightness of summer. Here’s why I think frozen peaches work so well in a peach jelly recipe:
- Convenience: Skip peeling and pitting—the hard work is done.
- Consistency: Bags of frozen peaches are flash-frozen at peak ripeness, locking in flavor and color.
- Less Waste: You won’t risk bruised or overripe fruit since frozen bags are sorted and trimmed.
- Year-Round Supply: Make homemade peach jelly long after fresh peach season ends.
This is a game-changer if you want to make peach jelly as gifts or need to restock the pantry before summer fruit is back.
How to Prepare Frozen Peaches for Jelly
Using frozen peaches in an easy peach jelly recipe is simple, but a few quick steps ensure the best results. Here’s what works best for me:
- Measure while frozen. Grab the cup or weight you’d use for fresh fruit (most recipes need about 3 pounds for 5 half-pint jars).
- Thaw gently. Place frozen peaches in a colander and thaw at room temperature or overnight in the fridge. Don’t use a microwave, as it can cook the edges and change texture.
- Proceed as usual. Use thawed peaches in place of fresh ones in your favorite peach jelly recipe with pectin. The process and pectin amounts stay the same.
Frozen peaches work especially well in a canned peach jelly recipe since all the fruit is heated and strained anyway.
Tips for Getting the Best Results
Getting a clear, well-set jelly is just as easy with frozen peaches as with fresh. Here’s what has helped me:
- Check quality: Only use frozen peaches with no added sugar, spices, or syrups.
- Mind the juice: Since thawed peaches may give off more water, you might get a little more juice than with fresh. Measure out exactly as your peach jelly recipe calls for (usually 3 cups of juice).
- Brighten with lemon: Frozen fruit sometimes tastes a little flat, so taste your juice before you begin. Add a splash more lemon juice if the flavor seems bland.
- Follow the recipe: Stick with the same steps for juicing, straining, and adding pectin, as you would in this Ball peach jelly recipe or other pectin-based recipe.
Frozen peaches make it easy to enjoy homemade peach jelly whenever you want. For even more ideas on using different fruits in jams and jellies, check out the Plum Jam Recipe for another simple preserving project that’s just as approachable.
If you love this canned peach jelly recipe, I encourage you to keep going with other preserves. Try a Pear Jam Recipe for more fruit inspiration or tackle a classic Apricot Jam Recipe next time. Each project helps sharpen your skills and fills your kitchen with satisfying results.
Recipe Card
Peach Jelly Recipe
Equipment
- Steam Juicer Optional
- Large stainless steel pot or Enameled Dutch Oven
- Enameled Dutch Oven or Large Stainless Steel Pot
- Water Bath Canner or Steam Canner
- Steam Canner or Water Bath Canner
Ingredients
- 3 lbs Peaches
- 1 1/2 cups water
- 1/2 cup Bottled Lemon Juice
- 1 package regular powdered fruit pectin (1.75 oz/49 to 57 g)
- 5 cups Granulated Sugar
Want to Save this Recipe?
Instructions
- Wash and quarter your peaches. (It is not essential to pit the peaches, but removing the pits before cooking reduces the bulk of soilds that must fit in the cheesecloth.)
- Place peaches and 1 1/2 cups of water (1/2 cup of water for each lb of peaches) in a large stainless steel pot or enameled Dutch oven. Bring to a boil over high heat, stirring frequently.
- Reduce the heat, cover the pot loosely, and boil gently, stirring and crushing the peaches occasionally, just until the peaches are softened (About 20 minutes). Do not overcook, as it reduces the flavor, color, and strength of the natural pectin.
- Pour the peach mixture through a mesh strainer lined with 3 layers of dampened cheesecloth into a bowl. Let peaches drain for 2 hours or until the juice measures 3 cups. To avoid cloudy jelly, do not press or squeeze the peaches.
- Alternate Juicing Method. Using a steam juicer is an alternate method to get the peach juice required for this recipe. Add water to the bottom section of the steam juicer. Add the middle and top sections of the steam juicer. Add your washed, quartered peaches to the top section of the steam juicer and add the lid. You can crush the peaches as they steam to release more juice. Turn the steam juicer to medium-high heat until the water begins to boil. Juice your peaches until you have at least 3 cups of peach juice.
- Wash your jars and lids in warm, soapy water. Make sure there are no chips or bubbles in your jars.
- Prepare your cannerUsing Water Bath Canner: Put your water bath canner on your stove. Add your canning rack to the water bath canner. Add enough water to cover jars with at least 2-3 inches of water. Start to bring your water to a boil. Using a Steam Canner: Put your steam canner on your stove. Add the steam canner rack to the bottom of the steam canner. Add the recommended amount of water to the steam canner according to the manufacturer. Put the lid on your steam canner and start your stove.
- Combine the peach juice and lemon juice in a large stainless steel pot or enameled Dutch oven. Whisk in the pectin until it is dissolved. Bring the mixture to a boil, over high heat, stirring frequently.
- Add the sugar all at once, stirring the mixture to dissolve. Return the mixture to a full rolling boil. Boil hard for 1 minute, stirring constantly.
- Remove from heat. Skim the foam off top of jelly, if necessary.
- Once you have hot jars and hot jelly.Water Bath Canner:Remove your jars from the boiling water one at a time using your jar lifter. Dump the water out of the jar into your water bath canner to ensure there is still 2-3 inches of water above your jars.Steam Canner:Remove the steam canner lid and remove your jars one at a time using your jar lifter.
- Ladle hot jelly into hot jars, leaving 1/4 inch (.5 cm) headspace (Check with headspace measurer). Remove air bubbles with a de-bubbler and adjust the headspace by adding more hot jelly if necessary.
- Wipe the rim to ensure a good seal is made with the lid. Center the lid on the jar and screw the band down to fingertip tight. Repeat until all jelly is used.
- Place jars in the canner with your jar lifter.
- Water Bath Canner:Lower the water bath canner rack into the boiling water. Ensure your jars are covered by at least 2 inches of water.If your water is not boiling start your processing time when the water is boiling. Process 1/2 pint jars for 10 minutes. Make sure to adjust your time for altitude.Set a timer, it makes it much easier to make sure you process for the correct time. When your timer goes off turn off the heat and remove the canner lid.Leave the jars in the water for 5 minutes.Steam Canner:Put the lid on the steam canner. Turn your stove on high until your steam canner water comes to a vigorous boil. Continue heating so the indicator is in the correct "Zone" per your altitude. Start your processing time when the needle reaches the maximum point you have tested your steam canner to reach in your "Zone".Adjust the burner so that it maintains an even rolling boil throughout the entire processing time. Usually, this will be much lower than where it was set for the vigorous boil. If the top lid is lifting and/or spitting water from the edges this is an indication that you have the heat turned up too high. Slowly reduce the heat until this stops. Watch the indicator to ensure the temperature does not decrease.The processing times for steam canning are the same as for water bath canning. Process 1/2 pint jars for 10 minutes.Make sure to adjust your time for altitude. Set a timer, it makes it much easier to make sure you process for the correct time.When your timer goes off turn off the heat and let the canner stand for 5 minutes with the lid on before removing the jars. The lid MUST remain ON the canner during this time. This cool-down period is necessary to ensure the jar contents are properly processed.Carefully remove the lid by tilting it away from you to avoid steam burns.
- Using your jar lifer carefully move the jars onto a wire rack or kitchen towel to allow them to cool. When moving the jars try not to tilt them to the side as this could affect the seal of the jars. Allow your jars to cool for 12-24 hours before handling.
- Once cool, remove the canning rings from the jars. Wash your jars off to ensure no food residue on the outside of the jar from processing. Label your jar with the name of the recipe and date. This will help you remember what recipe you used to can and the date will allow you to use the oldest canned goods first.


No Comment! Be the first one.